Thursday 5 December 2013

Intro to Arduino at KMS

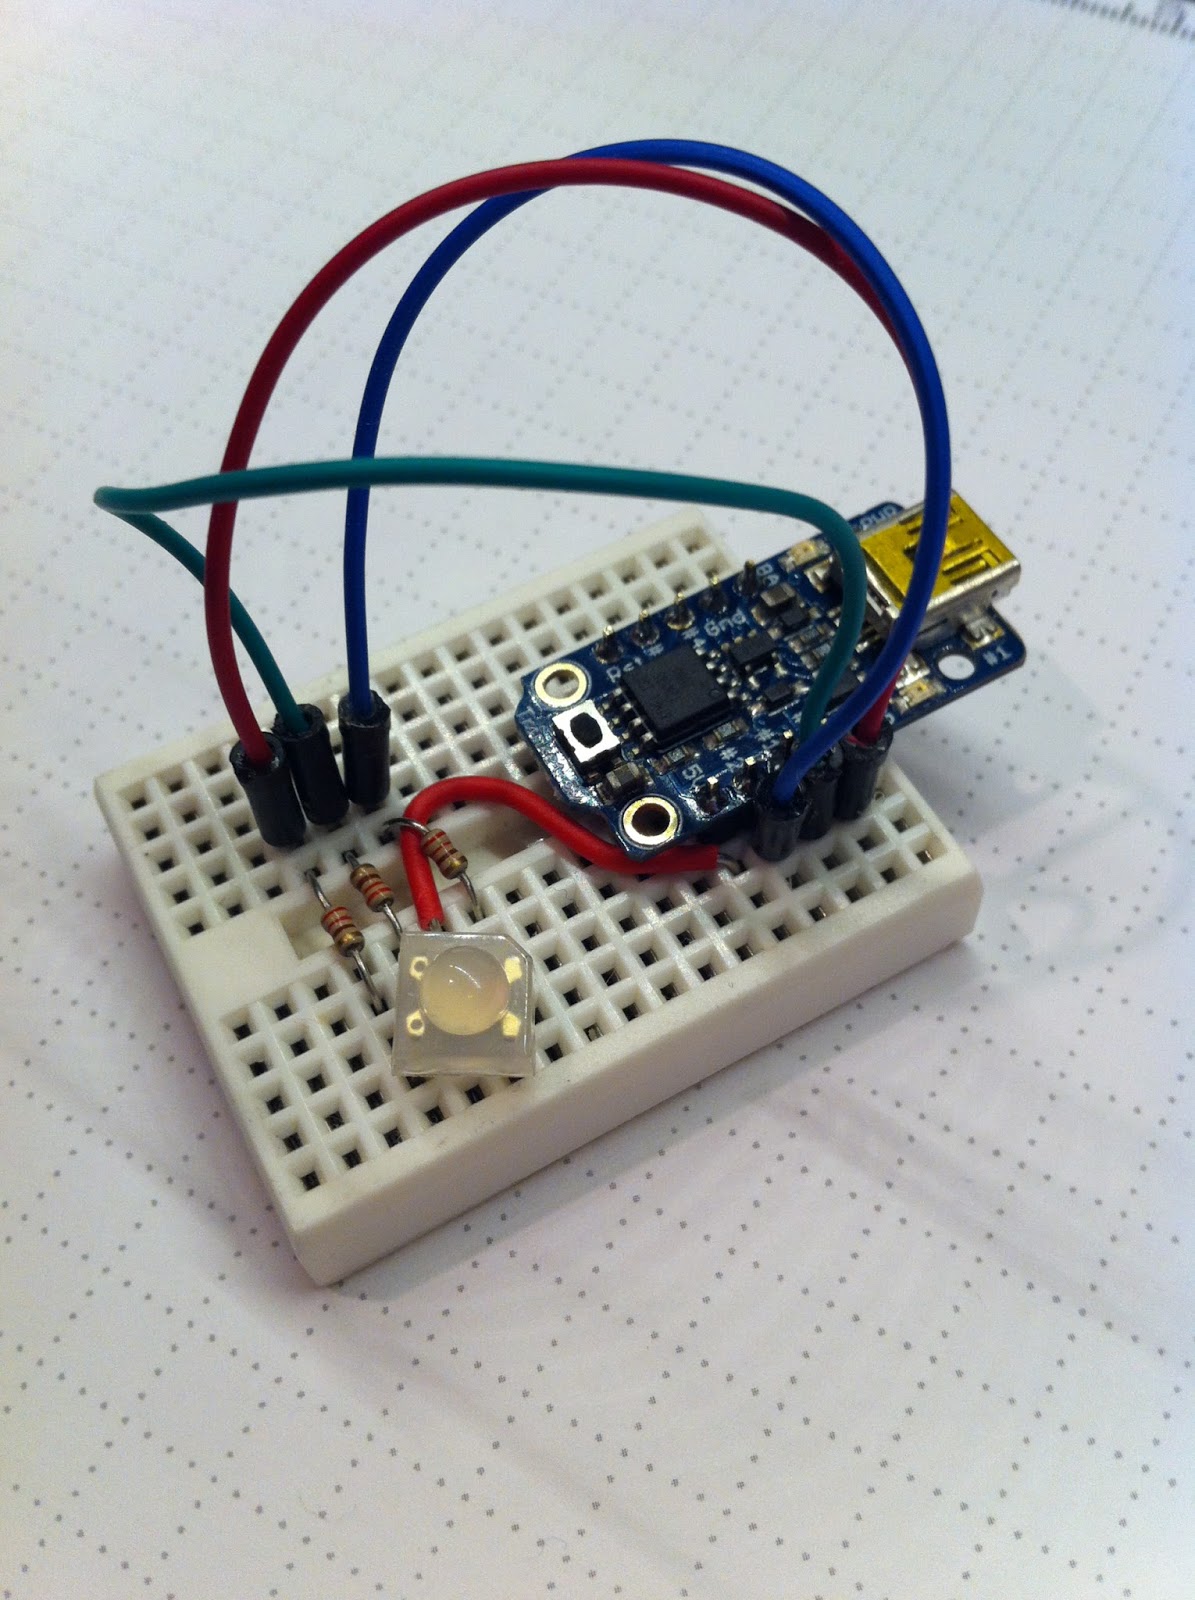
Adafruit Trinket
controlling an
RGB LED


Update: By popular demand I will be running this workshop again on April 14, 2014.

I volunteered to facilitate a workshop at Kingston MakerSpace next week to provide a very basic introduction to Arduino micro controllers. Here's the event advertising. There are many variants and imitators of Arduino. (Here's a Make article on which board?) Don't get hung up on picking one. Anything that is supported by the Arduino environment will give you a good learning platform to find out what you can do and what you need for each project.

There's an Arduino UNO hiding under there, matched up
with a breadboard and mounting plate that makes it
way easier to keep things together
That said, I would recommend the Arduino UNO board for beginners because it sets the standard and others may deviate a little from that standard and get confusing. It also has nice readable labels beside all the pin connections.

 You'll also need some way to connect the Arduino with components like LEDs and pushbuttons, and so on. A solderless breadboard makes that easy, and a mounting plate will hold them both together and help keep the wires from pulling out. (Bad connections are a very frustrating problem to debug.) I like the version in the Experimenter's Kit.

We'll get started step by step before you move on to other learning projects you choose yourself:

Install the Arduino integrated development environment (IDE) on your laptop in advance so you can bring it to the MakerSpace, or install it once you get there. (We have wireless and the password is on the wall.) I like the Adafruit Arduino 1.05 distribution. It is the latest standard version (1.05) from Arduino with  additional support for some of the Adafruit boards like Trinket and Flora that some of you will be using. (Any version of the Arduino IDE should be fine for this workshop if you are using the UNO.) The Mac install is seamless. The Windows install says it requires some fancy footwork with device drivers as detailed on the instruction pages, but the Win 7 machine I tested on automatically loaded the drivers for the UNO and worked. Same for the Arduino Micro. For windows you will have to unzip the distribution and copy it to your program files directory, then make a shortcut to run it from your desktop.

For the Trinket I had to do the detailed device driver install explained on the Adafruit pages, then set the programmer to USBTinyISP, and hook the Trinket to the USB through a hub (I had the same problem on a Macbook Pro). For a linux install you will probably have to edit the config files and add some stuff, but linux users are used to that ;-)

Connect your Arduino to a USB port and then create a program to say "Hello World". Open the Arduino program on your laptop and use the tools menu to pick the right Board and the Serial Port it's connected to. Type (or copy and paste) this code into the sketch window (a sketch is a little program).

void setup() {                
  Serial.begin(57600);   // get the serial port ready at 57600 baud
  pinMode(13,OUTPUT);    // set pin 13 to be in output mode
}

void loop() {
  digitalWrite(13,0);              // turn the LED off
  if(millis() % 1000 == 0){        // if we're at a round second
    Serial.print("Hello World! "); //   then say hello
    Serial.print("time is now ");
    Serial.print(millis());
    Serial.print(" ms from boot.\n");
    digitalWrite(13,1);            //   then turn the LED on
    delay(500);                    //   then wait half a second   
  }
}

Hit the right arrow icon to verify your sketch and upload it to the Arduino. Once it's running the LED on the board should start blinking on and off and the magnifying glass icon will let you see the serial port output from your sketch. (You may need to open the serial window and change the port speed to 57600 baud before anything good happens.) 

If you have a Trinket the sketch below from Adafruit will just flash the built-in LED on pin 1 for the Trinket, since it doesn't support Serial. (You'll need to push the button on the Trinket just before you upload.)


int led = 1; // blink 'digital' pin 1 - AKA the built in red LED

// the setup routine runs once when you press reset:
void setup() {
  // initialize the digital pin as an output.
  pinMode(led, OUTPUT);

}

// the loop routine runs over and over again forever:
void loop() {
    digitalWrite(led, HIGH); 
    delay(1000);
    digitalWrite(led, LOW);
    delay(1000);
}
 
It will also work with the UNO and others if you switch the coded pin number to 13, where they have a built-in LED. Can you explain to your partner what each line of code does and how it works?

Try changing the code to have it say hello to you by name.

How often does the Arduino run through the loop() function? How can you find out?

Now we'll try to light up our own LED, or three. This will tell you All About LEDs, or we can cut to the chase:

Never connect an LED to power without a resistor of more than 100 ohms in series (pick one with a third colour band that's brown). With no resistor to limit the current your LED will either get hot and wear out faster, flash brightly and never work again, or maybe go BANG! None of these are good outcomes.

Make sure the long lead (the anode) on the LED is on the positive side of the circuit. Getting it backwards will give you no light, but won't break anything.

This UNO based RFID reader opens and
locks the door at KMS
Try connecting an LED and resistor between the 5V (5 volts) and GND (ground or 0 volts) pins on your Arduino. Using some wires and a breadboard will make this easier. If the LED doesn't light up, you probably have it backwards. If it still doesn't light up, somebody probably connected it with no resistor and it needs to be thrown away.

Now connect to pin 13 (or pin 1 on the Trinket) instead of 5V and the LED should blink in time with the built-in LED.

There's tons more complicated things you can do with LEDs but start with Blink (we already did) and Pulse (below) then move on to RGB LEDs that combine three LEDs in one package and can give you any colour you want.

int led = 1; // pulse 'digital' pin 1 - AKA the built in red LED

// the setup routine runs once when you press reset:
void setup() {
  // initialize the digital pin as an output.
  pinMode(led, OUTPUT);
}

// the loop routine runs over and over again forever:
void loop() {
  for (int i=0; i<256; i++) {
    analogWrite(led, i);  // PWM the LED from 0 to 255 (max)
    delay(5);
  }
  for (int i=255; i>=0; i--) {
    analogWrite(led, i);  // PWM the LED from 255 (max) to 0
    delay(5);
  }
}

This Pulse sketch is just a little different from the Blink sketch up above. What's the difference between digitalWrite() and analogWrite()? What does PWM stand for and does it work on all the pins?

Add a pushbutton (or two) to control what happens based on user input. Can you use a pin for input and for output at the same time? Get more detailed control with Analog Inputs and a potentiometer.

Try controlling a servo motor next for an experience that's easy to wire up and pretty gratifying (Trinket version). The door lock on the MakerSpace is mostly just a servo being controlled to open and close the deadbolt. Please don't try to reprogram the lock until you are sure you know what you're doing.

If we get anywhere near this far in a two hour workshop, then I will be impressed.

Sunday 1 December 2013

Trinkets, Guino, and Updating the Teensy from Beta

The Adafruit trinket and flora require some special capabilities that I covered by installing the Adafruit Arduino 1.05 distribution. This is way easier than the original distribution that had to be installed manually over the stock Arduino 1.05. It also has support for all the usual Arduinos.

I installed the teensyduino 1.16 release with all libraries over the Adafruit 1.05 to support the teensy 3. Easy as pi and seems to work more smoothly than the betas, although I still have to push the button on the T3 at unpredictable times when uploading.

Guino provides a cool looking operational dashboard for the Arduino. It works with the UNO. It can't work with the Trinket because they don't do serial, and it doesn't work with the Arduino Micro or Teensy 3 because of software differences. Be sure to disconnect the GUI while reloading from Arduino or communications can get messed up.

Wednesday 27 November 2013

RFID Servo Lock for Kingston MakerSpace


Every MakerSpace needs a hackable lock system, so that was a project that had to happen immediately after we took possession. The target was simple, fast, and with as little new hardware as possible, not to mention avoiding damage to the landlord's lovely doors in our heritage building.

The basis for the control was an Arduino Uno with an Adafruit RFID Shield. Some of the pins were pulled out to some right angled header on the end for power and control to a servo. A MOS-FET was added to switch the servo power on and off as needed under control from a digital pin.

The servo is a Tower Pro with a max rating of 6 volts. Powered at 5 volts it is working hard and drawing quite a bit of current, so the board has to be powered through the USB port. If you try an external source, the current draw overloads the regulator on the Arduino and it resets.

The frame is from a tomato can and mounts between the latch knob and the door. The knob is a spare that I drilled a couple of holes in, leaving the original safe in the closet, and the actuation is with nylon blind cord.

The code gets the servo to back off and take a run at the actuation, then slack the cord after it's done. By turning the servo power off between actuations we save electricity and make it easy to operate the lock by hand or with an old fashioned mechanical key.


Owen helped me make the video by swiping cards while I tried to hold the camera steady.

Saturday 21 September 2013

Adafruit Trinket Trial

I couldn't resist buying a six pack of Trinkets, so now it's time to see if I can get one working. I went straight to the http://learn.adafruit.com/introducing-trinket/setting-up-with-arduino-ide page in the tutorial and followed the mac instructions. I renamed the ld file to avr-ld to match the one that was already in the package, then followed the instructions to select Trinket 8Mz as the board and USBtinyISP as the programmer. (Serial Port seems to be a non-issue...)

The blink sketch loaded and ran on a 3V Trinket with the results you would expect. Tried uploading the Button sketch from the next tutorial page and got avrdude: Error: Could not find USBtiny device (0x1781/0xc9f) repeatedly. Apparently you need to press the button on the Trinket before uploading to wake up the boot loader and the red LED will pulse for about 10 seconds, then fall back to whatever program was already loaded. Pulse also loaded and ran with the expected result. Switching to the 5V Trinket produced the same results.

Can it replace an Arduino Micro in the Hat Demo?

The brim of the ball cap has a little sign that
flips up and down on a servo
The Hat Demo is a ball cap I augmented for the Kingston Maker Space booth at this summer's Princess Street Promenade. It uses a Sharp proximity sensor to measure distance to whoever is fight in front of you, then actuates a servo to raise a little sign. Basically, the sign pops up when somebody comes close. It couldn't get much simpler. (Motors/ServoSharp has the code.)

Compiling produced errors from the servo library, which I would have expected if I had read http://learn.adafruit.com/trinket-gemma-servo-control/overview before I tried it. Switching the code over to the Adafruit_SoftServo library lets it compile.

The Arduino Micro version of the hat controller drives the servo and the Sharp sensor from the 5V regulated voltage on the Micro, which can supply an unspecified current. The trinket can provide up to 150 mA on the 5V pin. I tried a straight substitution and it didn't work for me. Back to start. Tried the TrinketKnob sketch and circuit and it provided sensible results. Turns out I needed some extra code for interrupts to keep the SoftwareServo stuff working. I also found that the servo rotated only half as far as it did with the Micro and the standard servo library.

Once I got it working I ran into some odd behaviour with the system working on USB, but behaving strangely when powered from a 9V battery. It seems to have been just loose wires, but there may have been some elements of getting slightly different voltages back from the analog sensor with the different supply. Still, with a little fiddling around I now have liberated the $30 Micro from the hat demo and replaced it with the $8 Trinket and that has the potential to bring down the cost of many small projects!

The trinket version has a controller smaller than the sensor, and cheaper too!


Thursday 18 July 2013

Python Arduino DAQ on the Mac

Kevin Hughes created a basic DAQ system in python to read Arduino analog voltages and display them on screen. He told me it should be platform independent, so I decided to try it on my mac. Steps to getting there [including mistakes where I slipped up]:

Get the arduino sketch running. This was simple, although I dropped the serial data rate to 57600 because that works with all the other stuff in my ecosystem.

[This was probably a huge mistake, as it looks like many libraries only work with python 2.7. Restored machine state and started again. Install python 3.3.2 for the mac, because that's the latest. After the install I still got python 2.7.2 from a terminal command line, even after a restart, but 'python3' gets 3.3.2.]

Serial Communications

Rely on the installed python 2.7.2 on the mac and install pySerial using Adafruit tutorial.

tar -xzf pyserial-2.6.tar.gz
cd pyserial-2.6
sudo python setup.py install

I confirmed pyserial was functioning by creating serialTst.py

import time
import serial

ser = serial.Serial('/dev/tty.usbmodemfa13131', 57600)

while True:
    message = ser.readline()
    print(message)
    time.sleep(0.5)

and it echoed output being written by the Arduino with Serial.println.

matplotlib

[The packaged matplotlib doesn't seem to work with the Apple release of Python. (matplotlib-1.2.1-py2.7-python.org-macosx10.6.dmg) from http://matplotlib.org/downloads.html gives an error saying "matplotlib 1.2.1 can't be installed on this disk. matplotlib requires System Python 2.7 to install.]

Following http://penandpants.com/2012/02/24/install-python/ (or maybe better http://penandpants.com/install-python/ and some of http://www.tapir.caltech.edu/~dtsang/python.html) provided alternatives after installing the xcode command line tools:

ruby -e "$(curl -fsSkL raw.github.com/mxcl/homebrew/go)"
brew doctor

brew install pkg-config
brew install freetype
brew install libpng

sudo easy_install pip
sudo pip install matplotlib

The matplotlib install produced a huge number of warnings, but reported successful installation at the end.

wxPython

Install wxPython (wxPython2.8-osx-unicode-py2.7) from http://wxpython.org/download.php. To get the install to work you need to allow installs from anywhere in system settings. see http://trac.wxwidgets.org/ticket/14523 and http://www.toolfarm.com/blog/entry/installing_osx_10.8_mountain_lion_please_read

Continuing

After all that installing, serialTst.py still works. Got the Arduino running Kevin's ArduinoDAQ on a fresh port tty.usbmodemfa13141. Changed the port in daq.py  and ran, but it fails on loading wxPython 2.8 with no 64 bit environment. wxPython 2.9 claims to be OK with both 32 and 64 bit, so I installed it and then python daq.py runs!

It generates repeating warnings if the Arduino environment is still running, but quitting it and rerunning python daq.py works great.


Tuesday 4 June 2013

Things I wish I knew about python and the WebIDE right away...

Python is interpreted, so you need to feed your source code to the interpreter program, typically with a command like python MyProgram.py. or you can just run python then start typing in commands the same as they would appear in your code. It takes me back to the bad old days of MS/BASIC. Alternately, if the first line in the .py file is #!/usr/bin/env python and you have changed the mode of the .py file to allow execution (chmod +x MyProgram.py) then you can run the file directly by name.

Indentation defines extent the way {} do in C, so whitespace matters.

The first thing you need to do is import the libraries you want to use in your code:

import sys
import RPi.GPIO as GPIO

imports the whole sys library, imports the RPi.GPIO library but lets you refer to it as GPIO for function calls like GPIO.setup(RST, GPIO.OUT)

from time import sleep

just imports the sleep function from the time library. Python finds all of these somewhere in the system libraries by following the path. You can add to the path like this:

sys.path.append("/home/pi/Examples")

so that

import Nokia.RWSpypcd8544 as nokia

will find the code in /home/pi/Examples/Nokia/RWSpypcd8544.py as long as /home/pi/Examples/Nokia/__init__.py also exists, even if it is empty. The code in the init file will run before importing the code from the named file. Note the use of a period rather than a slash. Now you can call things from RWSpypcd8544 with function calls like nokia.showFlower().

Running a WebIDE python program on system boot


It's pretty straightforward to use the WebIDE to write and run python programs from a web connection. Once those programs are working, you might want to run one of them automatically when the Pi starts up. /etc/rc.local is a script that will run as the final part of the boot sequence, so you can add a command to this script. The command I added was

sudo /usr/share/adafruit/webide/repositories/my-pi-projects/BlinkButtons/flashyNokia.py &

to run the program in background. Running it with sudo is required to give full access to the hardware features. To make the script run you will need to

sudo chmod +x /etc/rc.local

in order to make rc.local executable. You'll also have to run chmod +x against the .py file created by the IDE. You only need to do all of this once, even when you modify the program in the IDE.

Tuesday 16 April 2013

Same Desktop on HDMI and VNC

I wanted to have my Pi connected to a big HDMI TV on the other side of the room and control the desktop from a VNC window on another computer. It took me quite a while to find out how to do this, so I'm repeating it here. The secret was to use x11vnc instead of the tightvncserver I started off with. Install it, then store a password as the user you want to have access and it will be in ~/.vnc/passwd

sudo apt-get install x11vnc

x11vnc -storepasswd

Start the GUI on the HDMI first then run the x11vnc from the command line as the same user (either on the main desktop or remotely via ssh).


x11vnc -rfbauth ~/.vnc/passwd -display :0

Then run a VNC client like Real VNC and log in remotely on port :0.

Interestingly enough, it looks like x11vnc runs right alongside tightvncserver, allowing me to have one VNC window on port :0 (x11vnc) going to the HDMI desktop and another on port :1 (tightvncserver) with a new, independent desktop.

Wednesday 13 March 2013

Occidentalis WiFi Drop Problems

Further Update: A full installation based on 2013-02-09-wheezy-raspbian.img with samba, apache, Adafruit webIDE, etc. recovers from a network outage seamlessly both over a wired connection and wireless. Problem Solved!

Update: Ran blink with a 2013-02-09 Raspbian unmodified and the wireless was able to recover from a wireless drop. Ran rwspi with the Occidentalis distro updated as previously described and it doesn't recover from a wireless drop, but it recovers OK from a disconnected wired net connection on eth0, showing much the same sequence in the log -- thus the problem is wireless related.

The pi's lose their network connections when the wireless glitches and they fail to get it back. This has been happening every few days, apparently at random with the pi's attached to the Bell modem/router/wifi. I'm trying to figure out why. So now a test:

blink on BELL989 with keyboard and mouse and hdmi and ssh from imac
rwspi on BELL989 headless and ssh from imac
macbook on BELL989
imac on cable

depower and repower BELL989 at approx 17:06

The macbook shows loss of network at 17:05:49 and reconnection with no intervention by 17:07:03. The log looks nothing like the pi logs.

blink loses the connection at 17:05:52 then redetects the link beat by 17:06:43, but everything has run its course by then. /var/run/wpa_supplicant still exists as the directory created by root at boot time back at 13:11. The log looks just like the previous failures. Deleted the wpa_supplicant and the ifplugd.action script ran, but found no DHCP offers -- ran it again and it failed with the wpa_supplicant error again.


Mar 13 17:01:17 blink dbus[2195]: [system] Successfully activated service 'org.freedesktop.ConsoleKit'
Mar 13 17:05:52 blink ifplugd(wlan0)[1600]: Link beat lost.
Mar 13 17:06:03 blink ifplugd(wlan0)[1600]: Executing '/etc/ifplugd/ifplugd.action wlan0 down'.
Mar 13 17:06:03 blink dhclient: Internet Systems Consortium DHCP Client 4.2.2
Mar 13 17:06:03 blink ifplugd(wlan0)[1600]: client: Internet Systems Consortium DHCP Client 4.2.2
Mar 13 17:06:03 blink dhclient: Copyright 2004-2011 Internet Systems Consortium.
Mar 13 17:06:03 blink ifplugd(wlan0)[1600]: client: Copyright 2004-2011 Internet Systems Consortium.
Mar 13 17:06:03 blink dhclient: All rights reserved.
Mar 13 17:06:03 blink ifplugd(wlan0)[1600]: client: All rights reserved.
Mar 13 17:06:03 blink dhclient: For info, please visit https://www.isc.org/software/dhcp/
Mar 13 17:06:03 blink ifplugd(wlan0)[1600]: client: For info, please visit https://www.isc.org/software/dhcp/
Mar 13 17:06:04 blink dhclient: 
Mar 13 17:06:04 blink dhclient: Listening on LPF/wlan0/48:02:2a:6c:41:1b
Mar 13 17:06:04 blink ifplugd(wlan0)[1600]: client: Listening on LPF/wlan0/48:02:2a:6c:41:1b
Mar 13 17:06:04 blink dhclient: Sending on   LPF/wlan0/48:02:2a:6c:41:1b
Mar 13 17:06:04 blink ifplugd(wlan0)[1600]: client: Sending on   LPF/wlan0/48:02:2a:6c:41:1b
Mar 13 17:06:04 blink dhclient: Sending on   Socket/fallback
Mar 13 17:06:04 blink ifplugd(wlan0)[1600]: client: Sending on   Socket/fallback
Mar 13 17:06:04 blink dhclient: DHCPRELEASE on wlan0 to 192.168.2.1 port 67
Mar 13 17:06:04 blink ifplugd(wlan0)[1600]: client: DHCPRELEASE on wlan0 to 192.168.2.1 port 67
Mar 13 17:06:04 blink dhclient: suspect value in host_name option - discarded
Mar 13 17:06:04 blink ifplugd(wlan0)[1600]: client: suspect value in host_name option - discarded
Mar 13 17:06:04 blink ifplugd(wlan0)[1600]: client: Reloading /etc/samba/smb.conf: smbd only.
Mar 13 17:06:04 blink avahi-daemon[2222]: Withdrawing address record for 192.168.2.27 on wlan0.
Mar 13 17:06:04 blink avahi-daemon[2222]: Leaving mDNS multicast group on interface wlan0.IPv4 with address 192.168.2.27.
Mar 13 17:06:04 blink avahi-daemon[2222]: Interface wlan0.IPv4 no longer relevant for mDNS.
Mar 13 17:06:04 blink ifplugd(wlan0)[1600]: Program executed successfully.
Mar 13 17:06:06 blink ntpd[2747]: Deleting interface #2 wlan0, 192.168.2.27#123, interface stats: received=312, sent=316, dropped=0, active_time=10144 secs
Mar 13 17:06:06 blink ntpd[2747]: 216.194.70.2 interface 192.168.2.27 -> (none)
Mar 13 17:06:06 blink ntpd[2747]: 192.95.20.208 interface 192.168.2.27 -> (none)
Mar 13 17:06:06 blink ntpd[2747]: 199.85.124.148 interface 192.168.2.27 -> (none)
Mar 13 17:06:06 blink ntpd[2747]: 192.75.12.11 interface 192.168.2.27 -> (none)
Mar 13 17:06:06 blink ntpd[2747]: peers refreshed
Mar 13 17:06:38 blink ifplugd(wlan0)[1600]: Link beat detected.
Mar 13 17:06:38 blink ifplugd(wlan0)[1600]: Executing '/etc/ifplugd/ifplugd.action wlan0 up'.
Mar 13 17:06:39 blink ifplugd(wlan0)[1600]: client: ioctl[SIOCSIWAP]: Operation not permitted
Mar 13 17:06:39 blink ifplugd(wlan0)[1600]: client: ioctl[SIOCSIWENCODEEXT]: Invalid argument
Mar 13 17:06:40 blink ifplugd(wlan0)[1600]: client: ioctl[SIOCSIWAP]: Operation not permitted
Mar 13 17:06:41 blink ifplugd(wlan0)[1600]: client: rfkill: Cannot open RFKILL control device
Mar 13 17:06:41 blink ifplugd(wlan0)[1600]: client: ctrl_iface exists and seems to be in use - cannot override it
Mar 13 17:06:41 blink ifplugd(wlan0)[1600]: client: Delete '/var/run/wpa_supplicant/wlan0' manually if it is not used anymore
Mar 13 17:06:41 blink ifplugd(wlan0)[1600]: client: Failed to initialize control interface '/var/run/wpa_supplicant'.
Mar 13 17:06:41 blink ifplugd(wlan0)[1600]: client: You may have another wpa_supplicant process already running or the file was
Mar 13 17:06:41 blink ifplugd(wlan0)[1600]: client: left by an unclean termination of wpa_supplicant in which case you will need
Mar 13 17:06:41 blink ifplugd(wlan0)[1600]: client: to manually remove this file before starting wpa_supplicant again.
Mar 13 17:06:41 blink ifplugd(wlan0)[1600]: client: Failed to bring up wlan0.
Mar 13 17:06:41 blink ifplugd(wlan0)[1600]: Program executed successfully.
Mar 13 17:06:42 blink ifplugd(wlan0)[1600]: Link beat lost.
Mar 13 17:06:43 blink ifplugd(wlan0)[1600]: Link beat detected.


sudo /etc/init.d/networking restart didn't work. Tried with stop and then start, but that didn't connect either. In each case the activity looked just like when it's booting, except it didn't get the DHCP offer. I wonder if it has to do with some of the network services like samba, the web ide and apache not getting shutdown?


Mar 13 17:36:13 blink ifplugd(wlan0)[1600]: Link beat lost.
Mar 13 17:36:19 blink ifplugd(wlan0)[1600]: Link beat detected.
Mar 13 17:36:31 blink ifplugd(wlan0)[1600]: Link beat lost.
Mar 13 17:36:34 blink ifplugd(wlan0)[1600]: Link beat detected.
Mar 13 17:36:47 blink ifplugd(wlan0)[1600]: Link beat lost.
Mar 13 17:36:51 blink ifplugd(wlan0)[1600]: Link beat detected.
Mar 13 17:37:03 blink ifplugd(wlan0)[1600]: Link beat lost.
Mar 13 17:37:06 blink ifplugd(wlan0)[1600]: Link beat detected.
Mar 13 17:37:17 blink dhclient: Internet Systems Consortium DHCP Client 4.2.2
Mar 13 17:37:17 blink dhclient: Copyright 2004-2011 Internet Systems Consortium.
Mar 13 17:37:17 blink dhclient: All rights reserved.
Mar 13 17:37:17 blink dhclient: For info, please visit https://www.isc.org/software/dhcp/
Mar 13 17:37:17 blink dhclient: 
Mar 13 17:37:18 blink ifplugd(wlan0)[1600]: Link beat lost.
Mar 13 17:37:18 blink dhclient: Listening on LPF/wlan0/48:02:2a:6c:41:1b
Mar 13 17:37:18 blink dhclient: Sending on   LPF/wlan0/48:02:2a:6c:41:1b
Mar 13 17:37:18 blink dhclient: Sending on   Socket/fallback
Mar 13 17:37:18 blink dhclient: DHCPDISCOVER on wlan0 to 255.255.255.255 port 67 interval 6
Mar 13 17:37:19 blink ifplugd(wlan0)[1600]: Link beat detected.
Mar 13 17:37:24 blink dhclient: DHCPDISCOVER on wlan0 to 255.255.255.255 port 67 interval 10
Mar 13 17:37:31 blink ifplugd(wlan0)[1600]: Link beat lost.
Mar 13 17:37:34 blink ifplugd(wlan0)[1600]: Link beat detected.
Mar 13 17:37:34 blink dhclient: DHCPDISCOVER on wlan0 to 255.255.255.255 port 67 interval 21
Mar 13 17:37:46 blink ifplugd(wlan0)[1600]: Link beat lost.
Mar 13 17:37:48 blink ifplugd(wlan0)[1600]: Link beat detected.
Mar 13 17:37:55 blink dhclient: DHCPDISCOVER on wlan0 to 255.255.255.255 port 67 interval 16
Mar 13 17:38:01 blink ifplugd(wlan0)[1600]: Link beat lost.
Mar 13 17:38:02 blink ifplugd(wlan0)[1600]: Link beat detected.
Mar 13 17:38:11 blink dhclient: DHCPDISCOVER on wlan0 to 255.255.255.255 port 67 interval 8
Mar 13 17:38:15 blink ifplugd(wlan0)[1600]: Link beat lost.
Mar 13 17:38:18 blink ifplugd(wlan0)[1600]: Link beat detected.
Mar 13 17:38:20 blink dhclient: No DHCPOFFERS received.
Mar 13 17:38:20 blink dhclient: Unable to obtain a lease on first try.  Exiting.
Mar 13 17:38:31 blink ifplugd(wlan0)[1600]: Link beat lost.
Mar 13 17:38:34 blink ifplugd(wlan0)[1600]: Link beat detected.
Mar 13 17:38:47 blink ifplugd(wlan0)[1600]: Link beat lost.
Mar 13 17:38:50 blink ifplugd(wlan0)[1600]: Link beat detected.


rwspi loses the connection and is incognito.


Mar 13 17:05:52 rwspi ifplugd(wlan0)[1495]: Link beat lost.
Mar 13 17:06:02 rwspi ifplugd(wlan0)[1495]: Executing '/etc/ifplugd/ifplugd.action wlan0 down'.
Mar 13 17:06:02 rwspi dhclient: Internet Systems Consortium DHCP Client 4.2.2
Mar 13 17:06:02 rwspi ifplugd(wlan0)[1495]: client: Internet Systems Consortium DHCP Client 4.2.2
Mar 13 17:06:02 rwspi dhclient: Copyright 2004-2011 Internet Systems Consortium.
Mar 13 17:06:02 rwspi ifplugd(wlan0)[1495]: client: Copyright 2004-2011 Internet Systems Consortium.
Mar 13 17:06:02 rwspi dhclient: All rights reserved.
Mar 13 17:06:02 rwspi ifplugd(wlan0)[1495]: client: All rights reserved.
Mar 13 17:06:02 rwspi dhclient: For info, please visit https://www.isc.org/software/dhcp/
Mar 13 17:06:02 rwspi ifplugd(wlan0)[1495]: client: For info, please visit https://www.isc.org/software/dhcp/
Mar 13 17:06:02 rwspi dhclient: 
Mar 13 17:06:02 rwspi dhclient: Listening on LPF/wlan0/00:e0:4c:10:47:f1
Mar 13 17:06:02 rwspi ifplugd(wlan0)[1495]: client: Listening on LPF/wlan0/00:e0:4c:10:47:f1
Mar 13 17:06:02 rwspi dhclient: Sending on   LPF/wlan0/00:e0:4c:10:47:f1
Mar 13 17:06:02 rwspi ifplugd(wlan0)[1495]: client: Sending on   LPF/wlan0/00:e0:4c:10:47:f1
Mar 13 17:06:02 rwspi dhclient: Sending on   Socket/fallback
Mar 13 17:06:02 rwspi ifplugd(wlan0)[1495]: client: Sending on   Socket/fallback
Mar 13 17:06:02 rwspi dhclient: DHCPRELEASE on wlan0 to 192.168.2.1 port 67
Mar 13 17:06:02 rwspi ifplugd(wlan0)[1495]: client: DHCPRELEASE on wlan0 to 192.168.2.1 port 67
Mar 13 17:06:03 rwspi ifplugd(wlan0)[1495]: client: Reloading /etc/samba/smb.conf: smbd only.
Mar 13 17:06:03 rwspi avahi-daemon[2071]: Withdrawing address record for 192.168.2.24 on wlan0.
Mar 13 17:06:03 rwspi avahi-daemon[2071]: Leaving mDNS multicast group on interface wlan0.IPv4 with address 192.168.2.24.
Mar 13 17:06:03 rwspi avahi-daemon[2071]: Interface wlan0.IPv4 no longer relevant for mDNS.
Mar 13 17:06:03 rwspi ifplugd(wlan0)[1495]: Program executed successfully.
Mar 13 17:06:05 rwspi ntpd[2801]: Deleting interface #2 wlan0, 192.168.2.24#123, interface stats: received=896, sent=904, dropped=0, active_time=152721 secs
Mar 13 17:06:05 rwspi ntpd[2801]: 208.79.216.225 interface 192.168.2.24 -> (none)
Mar 13 17:06:05 rwspi ntpd[2801]: 192.75.12.10 interface 192.168.2.24 -> (none)
Mar 13 17:06:05 rwspi ntpd[2801]: 199.19.167.36 interface 192.168.2.24 -> (none)
Mar 13 17:06:05 rwspi ntpd[2801]: 142.4.209.106 interface 192.168.2.24 -> (none)
Mar 13 17:06:05 rwspi ntpd[2801]: peers refreshed
Mar 13 17:06:45 rwspi ifplugd(wlan0)[1495]: Link beat detected.
Mar 13 17:06:45 rwspi ifplugd(wlan0)[1495]: Executing '/etc/ifplugd/ifplugd.action wlan0 up'.
Mar 13 17:06:45 rwspi ifplugd(wlan0)[1495]: client: ioctl[SIOCSIWAP]: Operation not permitted
Mar 13 17:06:45 rwspi ifplugd(wlan0)[1495]: client: ioctl[SIOCSIWENCODEEXT]: Invalid argument
Mar 13 17:06:45 rwspi ifplugd(wlan0)[1495]: client: ioctl[SIOCSIWAP]: Operation not permitted
Mar 13 17:06:45 rwspi ifplugd(wlan0)[1495]: client: rfkill: Cannot open RFKILL control device
Mar 13 17:06:45 rwspi ifplugd(wlan0)[1495]: client: ctrl_iface exists and seems to be in use - cannot override it
Mar 13 17:06:45 rwspi ifplugd(wlan0)[1495]: client: Delete '/var/run/wpa_supplicant/wlan0' manually if it is not used anymore
Mar 13 17:06:45 rwspi ifplugd(wlan0)[1495]: client: Failed to initialize control interface '/var/run/wpa_supplicant'.
Mar 13 17:06:45 rwspi ifplugd(wlan0)[1495]: client: You may have another wpa_supplicant process already running or the file was
Mar 13 17:06:45 rwspi ifplugd(wlan0)[1495]: client: left by an unclean termination of wpa_supplicant in which case you will need
Mar 13 17:06:45 rwspi ifplugd(wlan0)[1495]: client: to manually remove this file before starting wpa_supplicant again.
Mar 13 17:06:45 rwspi ifplugd(wlan0)[1495]: client: Failed to bring up wlan0.
Mar 13 17:06:45 rwspi ifplugd(wlan0)[1495]: Program executed successfully.
Mar 13 17:06:46 rwspi ifplugd(wlan0)[1495]: Link beat lost.
Mar 13 17:06:47 rwspi ifplugd(wlan0)[1495]: Link beat detected.


http://bradfortner.wordpress.com/2013/01/03/how-i-set-up-my-raspberry-pi-lesson-3-demystifing-wi-fi-setup-for-my-raspberry-pi/ doesn't cover it, but points out some useful commands.


sudo ifup wlan0 – wakes up wireless interface at wlan0
iwconfig – shows connected network interfaces

More about startup

man init
/etc/rc?.d
/etc/profile.d
/var/log/syslog

Monday 11 March 2013

Thermocouple breath sensor

Somebody asked on G+ about sensing the breath that would blow out candles. I took up the challenge and figured I would try with a thermocouple, as the wire is cheap! A two junction system senses the difference in temperature between the two ends, requires no excitation voltage, but produces an output less than a millivolt, so major amplification is required.


This video shows the performance with the the thermocouple run through 2 AD 8221 instrumentation amps like I used for the load cells, each with gain set around 1000, so the output is saturating. The voltage will be low if the left junction is warmer and high if the right one is warmer.

Tuesday 19 February 2013

Adafruit Web IDE

Update: With the IDE installed on two separate pi using the same bit bucket account it seems to share the source code back and forth OK as long as you don't try to use both of them at the same time.

Having tried the manual instructions and failed (see below), I checked the "easy install" shell script and found it had provisions to use port 3000 if port 80 was already in use (e.g. by apache) so I just ran:

curl https://raw.github.com/adafruit/Adafruit-WebIDE/alpha/scripts/install.sh | sudo sh


[verbosity...]
**** Create webide user and group ****
**** Adding webide user to sudoers ****
/etc/sudoers.tmp: parsed OK
/etc/sudoers.d/README: parsed OK
**** Adding default .bashrc file for webide user ****
**** Installing the WebIDE as a service ****
**** (to uninstall service, execute: 'sudo update-rc.d -f adafruit-webide.sh remove') ****
update-rc.d: using dependency based boot sequencing
OK
**** WARNING: PORT 80 IN USE. FALLING BACK TO 3000. ****
**** TO CHOOSE A DIFFERENT PORT USE THE FOLLOWING COMMAND: ****
**** redis-cli HMSET server port 3000 ****
**** AND RESTART THE SERVER ****
**** Starting the server...(please wait) ****
**** The Adafruit WebIDE is installed and running! ****
**** Commands: sudo service adafruit-webide.sh {start,stop,restart} ****
**** Navigate to http://rwspi.local:3000 to use the WebIDE

Then I created a bitbucket account for sellensr based on my google id. I created a couple of files, then did a reboot on the Pi. The apache server still works with rwspi.local and the webIDE with rwspi.local:3000. The files are stored at:

/usr/share/adafruit/webide/repositories

and belong to user and group webide, thus I can't copy files over to there as pi on a vnc file manager screen. Oddly the easy way to move files from ~/pi into the ide is to enable the samba share, then upload the files from the share through the IDE. Odd, but works really well.

I've been doing all this in Safari, which isn't explicitly supported, but seemed to be working OK until I left the IDE and some other stuff broke. Probably best to run the IDE in a supported Chrome window and other things in Safari.

Some of the assumptions I made about directory structure are no longer valid if I move .py files to the IDE, but that shouldn't be a surprise.

webide added itself to the /etc/sudoers file and takes over the hardware. As a result, www-data couldn't use the serial port until I put it back in the /etc/sudoers file.

Trying to do the manual version was a bad plan


Building New Pi Base Images

So what happens if I brick the rwspi SD card? I want to be able to get back to somewhere like where I was, and also to be able to help others get the the same place. So I set out to make a clean install with all the good stuff I've added to rwspi so far, and none of my mistakes or personal data. I got really vexed in the process, because I couldn't get the hardware to work the way it did the first time I set up. The wifi was not behaving. It looks like the upgraded firmware was somehow not working with the old Occidentalis distribution, which shouldn't be a surprise once you get to it. 

So I eventually followed these steps to make a clean image on a 4 GB SD. The wifi worked when it was done. The processing took several hours to complete processing, so I have saved the unpersonalized image as OcciGen130219.img and a personalized version as FreshPi130219.img with my networks and passwords in it. Part of the time was consumed by figuring out that the errors were a result of the Raspbian site being down this morning rather than anything I was doing.

Update: A different wifi adapter requires a reconfig from start, so I repeated the process to create blink130305.img that runs with the B-LINK all black USB wifi dongle.

Also created an OcciClean130304.img image with no wifi installed.

Started from 2013-02-09-wheezy-raspbian.img to create RaspiClean130323.img with all the services below, but no wifi, no wpa file edits. Had to run sudo apt-get install git-core before the firmware update would run properly. Initialized a new blink image from there and added wireless from config utility on desktop. Did the same for an rwspi image.

Feel free to step through the same process to build a copy. I'd share, but I don't have an easy way to share something that big without writing it to an SD.

# make the raw image on SD by running this on the mac (the rest is on the Pi)
# sudo dd bs=1m if=Occidentalis_v02.img of=/dev/rdisk2

# boot with net cable attached and use raspi-config to expand the file system
#      set the keyboard, timezone, enable ssh and desktop, then finish and reboot

# get the latest upgrades
sudo apt-get update
sudo apt-get upgrade

# get the latest firmware, then reboot (needs to be repeated for new Pis)
sudo wget https://raw.github.com/Hexxeh/rpi-update/master/rpi-update -O /usr/bin/rpi-update
sudo chmod +x /usr/bin/rpi-update
sudo rpi-update

# use raspi-config to update raspi-config, then set GPU split to 32 MB and reboot


# install samba for file sharing on the network
sudo apt-get update
sudo apt-get install samba
sudo apt-get install samba-common-bin
# set password as 'raspberry'
sudo smbpasswd -a pi
sudo nano /etc/samba/smb.conf
#   Uncomment or change these lines in /etc/samba/smb.conf
#   security = user
#   socket options = TCP_NODELAY
#   [homes]
#   readonly = no
#   valid users = pi


# install the tightvncserver if not already there

sudo apt-get install tightvncserver

# install the apache web server -- it will occupy port 80
sudo apt-get install apache2 php5 libapache2-mod-php5
# mysql password set to 'raspberry'
sudo apt-get install mysql-server mysql-client php5-mysql
sudo service apache2 restart
sudo nano /etc/inittab
# comment out the ttyAMA0 line at the end of /etc/inittab
# T0:23:respawn:/sbin/getty -L ttyAMA0 115200 vt100
# make tty devices available to the web server to use serial port
sudo adduser www-data tty


# install the Adafruit WebIDE -- it will go on port 3000 since 80 is taken
curl https://raw.github.com/adafruit/Adafruit-WebIDE/alpha/scripts/install.sh | sudo sh

# install some python -- some of this may be redundant
sudo apt-get install python-dev
sudo apt-get install python-rpi.gpio
sudo apt-get install python-smbus
sudo apt-get install i2c-tools
sudo apt-get install python-pip
sudo pip install feedparser
sudo easy_install -U distribute
sudo pip install RPi.GPIO
sudo apt-get install python-serial


# get the latest upgrades just to check all up to date
sudo apt-get update
sudo apt-get upgrade

# shutdown and back to the mac to run
# sudo dd if=/dev/rdisk2 of=OcciGen130219.img bs=1m
# then create a new SD with 
sudo dd bs=1m if=OcciGen130219.img of=/dev/rdisk2

# then back to the Pi and personalize the installation as freshpi.local
# network files copied from rwspi to work with 165 Bagot networks
sudo smbpasswd -a pi
sudo nano /etc/network/interfaces
sudo nano /etc/wpa_supplicant.conf
sudo nano /etc/hostname
sudo nano /etc/hosts
#reboot to be freshpi
passwd 
sudo passwd mysql
tightvncserver :1


# all works, so shutdown and back to the mac to run
# sudo dd if=/dev/rdisk2 of=FreshPi130219.img bs=1m


Tuesday 12 February 2013

Pi Progress Tidbits and Serial Communications

Installed the Pi Store App. All went smoothly, but nothing very exciting to be found there... at least for me.

Configured the keyboard using the raspi-config program. Find the layout, then hit return to change the locations of the tilde and get the dollar sign instead of pounds sterling.

Apparently there is no root password created by default, so no root access except via sudo from pi.

Added www-data to the /etc/sudoers file. I'm not sure that's a great idea from a security point of view but it does let php run sudo tasks ;-)     sudo adduser www-data dialout didn't make the serial port available, even though /dev/ttyAMA0 belongs to root and group dialout, but sudo adduser www-data tty did let www-data use the serial port without sudo. This means that the web server can run a program that sends data to and from the serial port to control something else external, like an Arduino. It also means I can take www-data out of the /etc/sudoers file and sudo deluser www-data dialout.

Still have problems with the network dropping overnight. Pi was still running and responding to button pushes. Could it be an overnight timeout thing? Failing to renew DHCP? It was more than just dropping an idle terminal session because I couldn't log back in. It didn't repeat the next night, or the next.

sudo apt-get install libi2c-dev to install the I2C support and then installed WiringPi for the familiar Arduino type interface and the ability to run without root privileges. Installed WiringPi-python for the wrapper. Unfortunately the export process is not getting me control of the pins. I'll need linux geek help with this one I think.


Serial Communications: 

The Pi is 3.3V and other serial ports can be 5 V or more. Be careful. For a simple start I edited /etc/inittab to comment out the console getty near the end of the file.

#Spawn a getty on Raspberry Pi serial line
#T0:23:respawn:/sbin/getty -L ttyAMA0 115200 vt100

minicom -b 57600 -o -D /dev/ttyAMA0

Making a direct, 3 wire (TX/RX/GND) connection to the DUE works bidirectionally at 57600 with minicom and echoing back.  It also works over an XBee link if the XBee is not powered from the Pi. The 3.3V on the Pi is not strong enough to sustain the Nokia display and transmit on the XBee.

sudo apt-get install python-serial to get the serial library for python (API). This code will then read and write stuff to the serial port.

import serial

p = serial.Serial('/dev/ttyAMA0',57600)
while 1:
  s = p.readline()
  print s
  p.write("this is what I think\n")


Connecting with I2C

This is the newly configured breadboard, a bamboo
cutting board for $3 from the dollar store with holes and
zip ties to hold the processors in place and self adhesive
mounting tape for the solderless plug-in breadboards
and the USB hub. All the power (except to the processors
through USB) is coming from the Arduino DUE
in the top corner, as it is good for up to 800 mA of 3V3.
I already installed a bunch of stuff for software support so it should be plug and go on the breadboard... and it was as simple as hoped for. The breakout boards are wired to power and connected to the I2C pins of the Pi through the green (SCL) and yellow (SDA) leads.

sudo i2cdetect -y 1

Shows an ADS1115 16 Bit ADC at 0x48 and a MPL115A2 Barometric Temperature / Pressure sensor at 0x60. The DAC Note seems to be out of date on the library as the version I've got already had the links to Adafruit_I2C.py created and there was code to check the revision number automatically. Still, the link is a tidy way to get the libraries in without setting the path variable.

Switching to the ADS1x15 directory got me an example already set up for the 1115, but you would need to edit for the 12 bit version, the ADS1015, that behaves almost identically. With pins floating I get:

sudo python ads1015_example.py 
Channel 0 = 0.598 V
Channel 1 = 0.591 V

A close up of the breakout boards with the I2C boards
lower and the analog accelerometer board in the top left.
There's no library code for the MPL115A2 so I will ignore it for now. A little modification to the example program allows ads1115.py to read all 4 channels once a second and put the output on a single line. Attaching the analog outputs from the +/-16 G Accelerometer breakout board gives the kind of results you would expect. Pin 0 is connected to the supply voltage.

With this sort of addition to the Pi you get a high resolution reading of analog voltages so you can respond to an analog world. It adds a little price and complexity over a microcontroller with built in ADC capabilities and it won't read the data as fast over I2C as you can get it from the integrated ADC ports.


sudo python ads1115.py

Channel 0 = 3.275 V Channel 1 = 1.637 V Channel 2 = 1.625 V Channel 3 = 1.711 V
Channel 0 = 3.275 V Channel 1 = 1.637 V Channel 2 = 1.625 V Channel 3 = 1.710 V

Friday 8 February 2013

Pi Power Dance

Do it this way, really!
Power seems to be at the root of almost all Raspberry Pi problems. I refused to believe what I read and you probably will too. The experience could be a valuable relearning of the basic high school physics of electricity or it could just be frustrating. You can avoid this learning experience by hooking power up like in the picture above. (Yes, there may also be HDMI and network cable connections to the Pi, but they shouldn't be carrying power.)

What I Learned (after much dancing about)

Most power supplies are OK: not great, but OK, meaning they can supply something close to their rated power while still providing a voltage greater than 4.75 volts at the power supply outlet. There are certainly some really crummy power supplies out there -- avoid counterfeit Apple stuff.

USB Micro B cables have thin wires: thin enough to have relatively high resistance, and thin enough that the voltage at the micro B plug on an operating Raspberry Pi can be 4.65 volts even when the voltage at the power supply is still 5.02 volts. V=IR and these cables were really not intended to be used as extension cords.

Tiny WiFi dongles use big power: Sending radio signals requires power and too low a supply voltage will cause the communication to fail. The power draw may pull the supply voltage even lower and cause erratic behaviour from low power devices like a keyboard or mouse.

CAUTION! You may be able to power the Pi from the Hub: but only Maybe! The hub will need to be one that provides charging ports capable of supplying more than the usual 500 mA of current. You will have to be lucky, and stay lucky. If the hub power supply provides 5V it will drop before it gets to the hub due to resistance in the power cord, then it will drop across the circuitry in the hub, then it will drop some more in the USB cable to the Pi. In my case that gets it down to about 4.5 to 4.6 V on the Pi, depending on what the Pi is doing at the time. That seems to be OK if there is nothing expecting any power at all from the Pi USB ports -- the hub is only getting its signals from the Pi USB and the second port on the Pi is empty. Anything hooked to the GPIO 5V pins will also see this reduced voltage and may not work as expected. Go back to two separate plugs in the wall at the first sign of trouble. CAUTION!

5.25 Volts is within spec: You could solve most of these problems by using a 5.25V like the one Adafruit sells, but they are currently out of stock and not expecting more for weeks.

Thursday 7 February 2013

Back Up the Pi

Easiest to do, with the samba share working, was copy the contents of the pi user directory to a directory on my mac, which gets backed up by time machine. That still leaves backing up an image of the full system, with all the permissions and everything. I put the card in the reader did the "About This Mac" thing again. This time the card reader was listed as disk2s1 instead of disk3s1 (probably because I didn't have the USB key connected) so I typed:


mkdir RaspberryPi
cd RaspberryPi
sudo dd if=/dev/rdisk2 of=rwspi20120207.img bs=1m


in the mac terminal window. There were lots of disk noises, but no other response to the terminal for a long time. (1050 seconds is 17 1/2 minutes but it seemed longer)


15271+0 records in
15271+0 records out
16012804096 bytes transferred in 1050.493195 secs (15243130 bytes/sec)

resulted in a 16 GB .img file on my mac for the 16 GB card size. I ejected the card and put in another 16 GB card. I erased the partition that existed on the card, then reversed the if/of arguments to produce a copy:

sudo dd of=/dev/rdisk2 if=rwspi20120207.img bs=1m
15271+0 records in
15271+0 records out
16012804096 bytes transferred in 1123.638986 secs (14250844 bytes/sec)

took less time to write than I expected. I ejected the SD, put it in the Pi and it booted just like the original. 

Dropbox would be cool to have, but a little googling suggests it would be difficult.

Hammer vs Screw Driver

What's better for your project, a Raspberry Pi or an Arduino? Linux or a microcontroller? I'm not an expert by far, but some people have been asking me this question and I've been asking it myself for a couple of projects, so here's a short answer from my perspective:

A Raspberry Pi (or other general purpose computer) is good for doing multiple things at a time and interacting with people, especially people at a distance, even multiple people at the same time. It can also interact with hardware attached to it and switch things on and off, make some measurements, etc. There are no guarantees about how quickly everything will happen and response will slow down as you ask it to do more things. That's fine if you don't care if your sprinkler goes on right now, or just really soon. For things that are really time critical, your Pi may not be watching at just the right moment and might miss something. (WiringPi incorporates interrupts on the Pi.) (Latency data below.) Without additional hardware your Pi will only read on/off (digital) signals so you can tell the difference between dark and light, but not between a sunny day and a cloudy day (analog).

An Arduino (or other microcontroller) runs only one program at a time, so your program will always be in control and will only miss something if your program ignored it for too long. If it's really important to catch it, you can set one of the hardware interrupts to run a function whenever something happens. This will let you update whatever you're trying to control much faster than 100 times a second. It directly supports both analog and digital signals to measure things like how bright it is outside.

If your project needs to talk to people and be network friendly, include a Raspberry Pi.

If your project needs to read analog data and react to inputs right away, 100 times a second, include a microcontroller.

If it needs to do both, then maybe you need both and there is certainly room for both in most boxes and budgets. There are lots of different ways to interface them so that the Pi can concentrate on UI, communications and data storage while the microcontroller concentrates on making everything happen at exactly the right time. If space or budget are really tight you may be able to cover both with a single unit, but it may be more difficult. Other details to consider include:

Memory: A general purpose computer usually has more volatile memory (e.g. 512MB RAM on the Pi) where you can store programs, or data that change often and have them vanish when you turn off the power. A microcontroller usually has less volatile memory (e.g. 2KB on the UNO) combined with some non-volatile memory where you can store programs that won't vanish when you turn off the power.

Booting: A general purpose computer has to load programs into volatile memory and initialize them before anything useful happens. (This can take about a minute for a Pi from and SD card.) A microcontroller already has a program in memory and starts doing useful things almost immediately. (a few seconds on an UNO with the bootloader, or less.)

It's important to pick the right tools for the job. I found these hemostats from Pakistan at Princess Auto for a few bucks each. Very useful for fine work and clamping! Lousy for driving screws or nails. The little board getting the power leads soldered on is a Teensy 3.0 microcontroller with processing power similar to a Raspberry Pi and much faster than an Arduino UNO.


Pinging from one pi to another over wireless on the same wifi network shows it can be quite fast, except when it's not. If latency of less than 1/4 second is important, you may want another solution.


64 bytes from rwspi.local (192.168.2.24): icmp_req=1421 ttl=64 time=225 ms
64 bytes from rwspi.local (192.168.2.24): icmp_req=1422 ttl=64 time=28.2 ms
64 bytes from rwspi.local (192.168.2.24): icmp_req=1423 ttl=64 time=223 ms
64 bytes from rwspi.local (192.168.2.24): icmp_req=1424 ttl=64 time=25.1 ms
64 bytes from rwspi.local (192.168.2.24): icmp_req=1425 ttl=64 time=12.9 ms
64 bytes from rwspi.local (192.168.2.24): icmp_req=1426 ttl=64 time=203 ms

Pinging google.com is reliably faster over a much longer path:

PING google.com (74.125.226.66) 56(84) bytes of data.
64 bytes from yyz06s07-in-f2.1e100.net (74.125.226.66): icmp_req=1 ttl=54 time=18.8 ms
64 bytes from yyz06s07-in-f2.1e100.net (74.125.226.66): icmp_req=2 ttl=54 time=15.1 ms
64 bytes from yyz06s07-in-f2.1e100.net (74.125.226.66): icmp_req=3 ttl=54 time=20.5 ms
64 bytes from yyz06s07-in-f2.1e100.net (74.125.226.66): icmp_req=4 ttl=54 time=14.0 ms